Back
December 6, 2023
6
min read

Getting Started With PyFlink on Kubernetes

By
Gunnar Morling
Share this post

The other day, I wanted to get my feet wet with PyFlink. While there is a fair amount of related information out there, I couldn’t find really up-to-date documentation on using current versions of PyFlink with Flink on Kubernetes.

Kubernetes is the common go-to platform for running Flink at scale in production these days, allowing you to deploy and operate Flink jobs efficiently and securely, providing high availability, observability, features such as auto-scaling, and much more. All of which are good reasons for running PyFlink jobs on Kubernetes, too, and so I thought I’d provide a quick run-through of the required steps for getting started with PyFlink on Kubernetes as of Apache Flink 1.18.

In the remainder of this blog post, I’m going to explore how to

  • install Flink and its Kubernetes operator on a local Kubernetes cluster,
  • install Kafka on the same cluster, using the Strimzi operator,
  • create a PyFlink job which creates some random data using Flink’s DataGen connector and writes that data to a Kafka topic using Flink SQL, and
  • deploy and run that job to Kubernetes.

The overall solution is going to look like this:
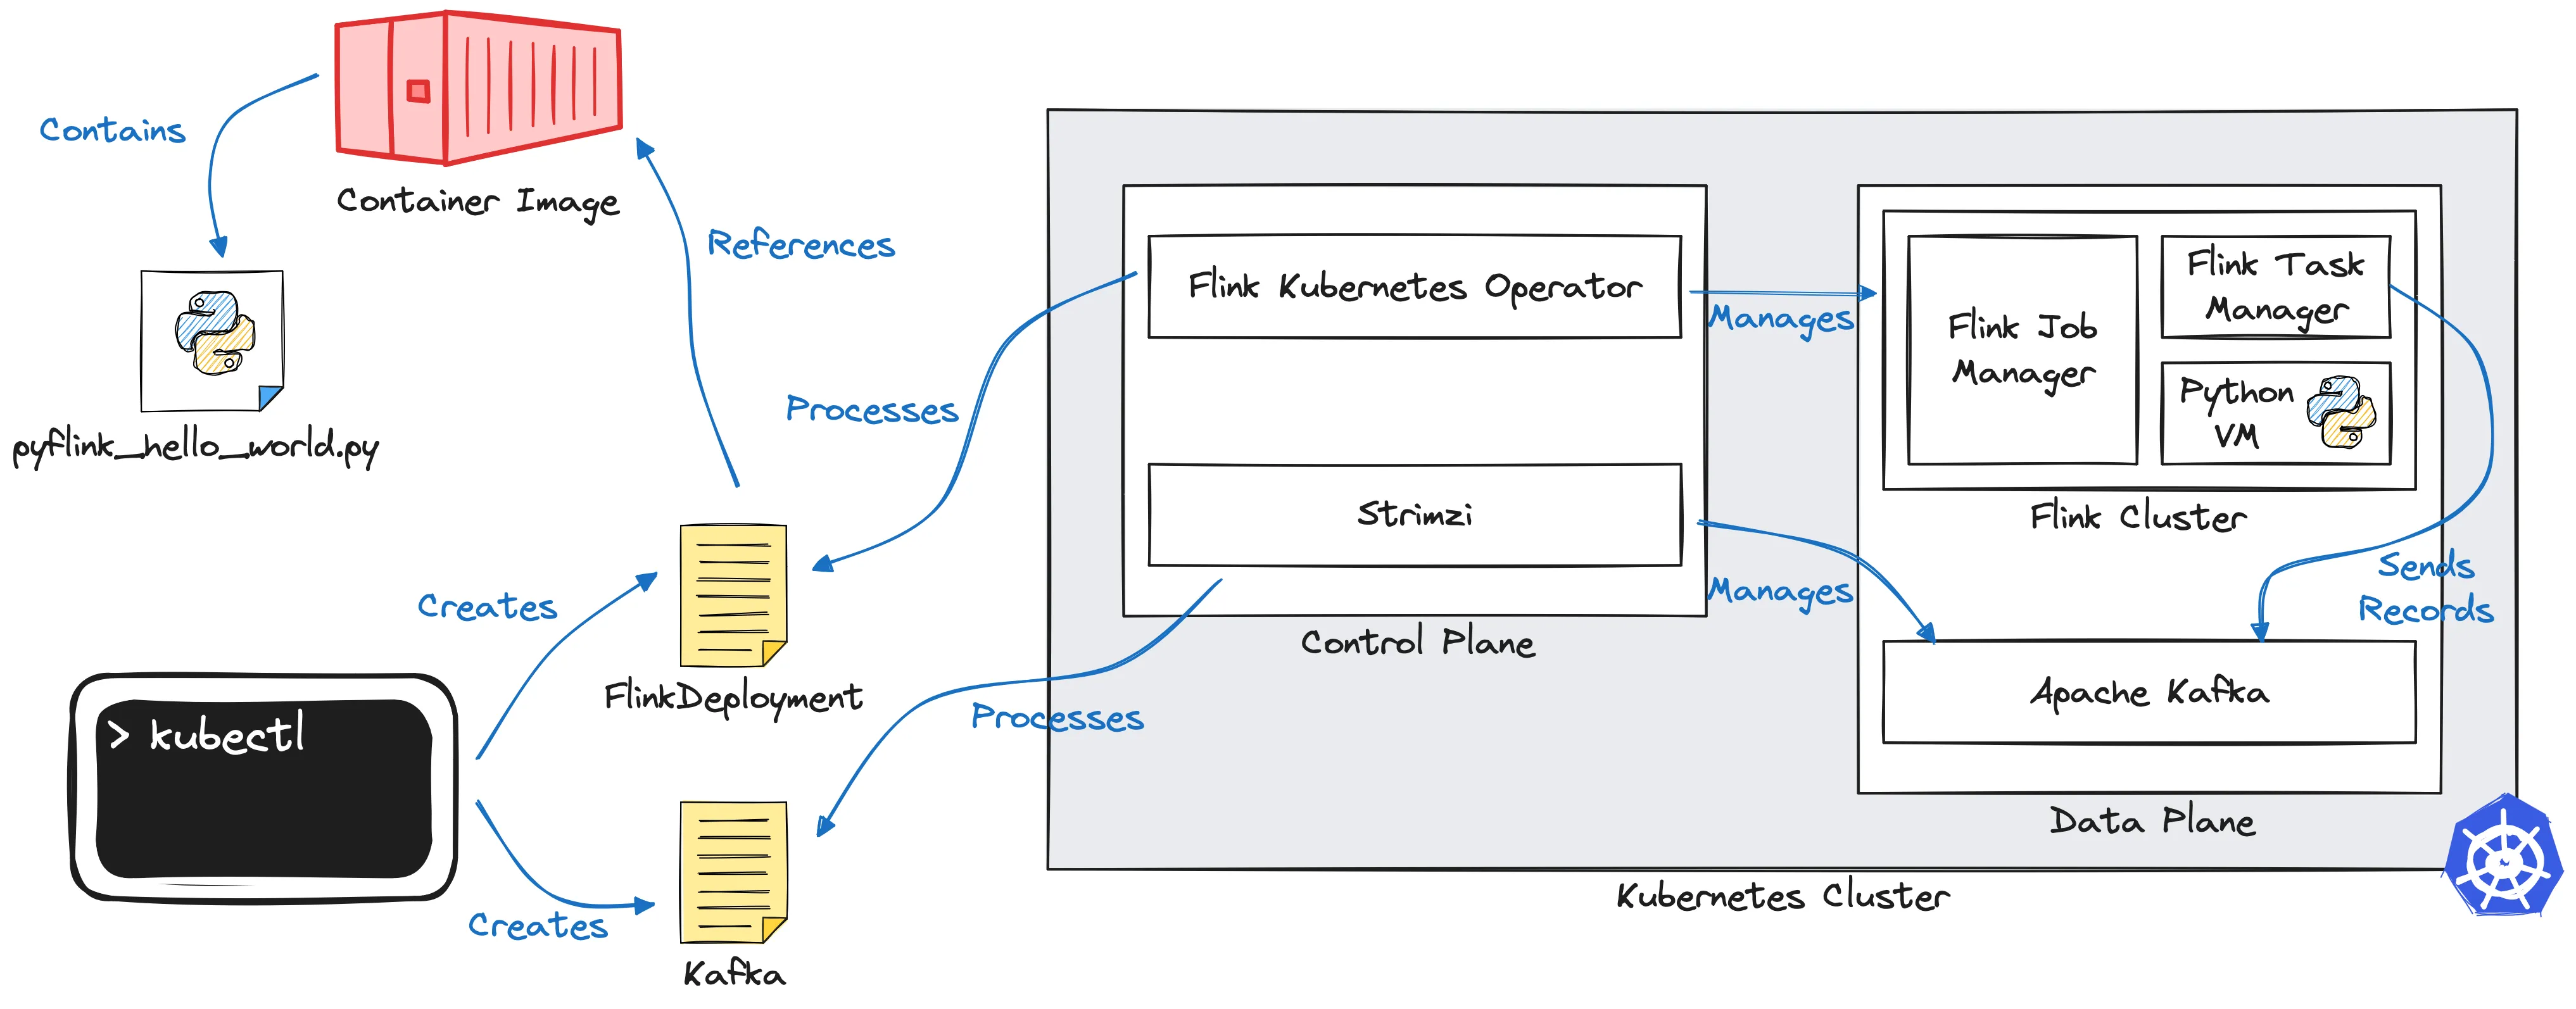
Fig.1: Solution Overview (click to enlarge)

What Is PyFlink and Why Should You Care?

In a nutshell, PyFlink is the Python-based API to Apache Flink. Per the docs, it enables you to

“build scalable batch and streaming workloads, such as real-time data processing pipelines, large-scale exploratory data analysis, Machine Learning (ML) pipelines and ETL processes”.

It is particularly useful for development teams who are more familiar with Python than with Java and who still would like to benefit from Flink’s powerful stream processing capabilities. Another factor is Python’s rich 3rd party ecosystem: not only does it provide libraries for data engineering (e.g. Pandas) and scientific computing (e.g. NumPy), but also for ML and AI (e.g. PyTorch and TensorFlow), which makes PyFlink the ideal link between these fields and real-time stream processing. So if for instance you wanted to train your ML models on real time event data sourced from your production RDBMS, doing some data cleaning, filtering, and aggregation along the way, PyFlink would be a great option.

Similar to Flink’s Java APIs, PyFlink comes with a DataStream API and a Table API. The former lets you implement operations such as filtering and mapping, joining, grouping and aggregation, and much more on data streams, providing you with a large degree of freedom and control over aspects such as state management, late event handling, or output control. In contrast, the Table API offers a more rigid but also easier-to-use and less verbose relational programming interface, including support for defining stream processing pipelines using SQL, benefitting from automatic optimizations by Flink’s query planner.

Implementation-wise, PyFlink acts as a wrapper around Flink’s Java APIs. Upon start-up, the job graph is retrieved from the Python job using Py4J, a bridge between the Python VM and the JVM. It then gets transformed into an equivalent job running on the Flink cluster. At runtime, Flink will call back to the Python VM for executing any Python-based user-defined functions (UDFs) with the help of the Apache Beam portability framework. As of Flink 1.15, there’s also support for a new execution mode called “thread mode”, where Python code is executed on the JVM itself (via JNI), avoiding the overhead of cross-process communication.

Prerequisites

So let’s set up a Kubernetes cluster and install the aforementioned operators onto it. To follow along, make sure to have the following things installed on your machine:

  • Docker, for creating and running containers
  • kind, for setting up a local Kubernetes cluster (of course you could also use alternatives such as MiniKube or a managed cluster on EKS or GKE, etc.)
  • helm, for installing software into the cluster
  • kubectl, for interacting with Kubernetes

Begin by creating a new cluster with one control plane and one worker node via kind:

{ cat | kind create cluster --name pyflink-test --config -; } << EOF
kind: Cluster
apiVersion: kind.x-k8s.io/v1alpha4
nodes:
  - role: control-plane
  - role: worker
EOF

After a minute or so, the Kubernetes cluster should be ready, and you can take a look at its nodes with kubectl:

kubectl get nodes
NAME                          STATUS ROLES          AGE  VERSION
pyflink-test-2-control-plane  Ready  control-plane  67s  v1.27.3
pyflink-test-2-worker         Ready           48s  v1.27.3

Installing the Flink Kubernetes Operator

Next, install the Flink Kubernetes Operator. Official part of the Flink project, its task will be to deploy and run Flink jobs on Kubernetes, based on custom resource definitions. It is installed using a Helm chart, using the following steps (refer to the upstream documentation for more details):

  1. Deploy the certificate manager (required later on when the operator’s webhook is invoked during the creation of custom resources): <span class="inline-code">kubectl create -f https://github.com/cert-manager/cert-manager/releases/download/v1.8.2/cert-manager.yaml</span>
  2. Add the Helm repository for the operator: <span class="inline-code">helm repo add flink-operator-repo https://downloads.apache.org/flink/flink-kubernetes-operator-1.7.0/</span>
  3. Install the operator using the provided Helm chart: <span class="inline-code">helm install flink-kubernetes-operator flink-operator-repo/flink-kubernetes-operator</span>

After a short time, a Kubernetes pod with the operator should be running on the cluster:

kubectl get pods
NAME                                     READY  STATUS   RESTARTS  AGE
flink-kubernetes-operator-f4bbff6-jtd4x  2/2    Running  0         0h17m

Installing Strimzi and Apache Kafka

With the Flink Kubernetes Operator up and running, it’s time to install Strimzi. It is another Kubernetes Operator, in this case in charge of deploying and running Kafka clusters. Strimzi is a very powerful tool, supporting all kinds of Kafka deployments, Kafka Connect, MirrorMaker2, and much more. We are going to use it for installing a simple one node Kafka cluster, following the steps from Strimzi’s quickstart guide:

  1. Create a Kubernetes namespace for Strimzi and Kafka:
    <span class="inline-code">kubectl create namespace kafka</span>
  2. Install Strimzi into that namespace:
    <span class="inline-code">kubectl create -f 'https://strimzi.io/install/latest?namespace=kafka' -n kafka</span>
  3. Create a Kafka cluster:
    <span class="inline-code">kubectl apply -f https://strimzi.io/examples/latest/kafka/kafka-persistent-single.yaml -n kafka</span>

Again this will take some time to complete. You can use the <span class="inline-code">wait</span> command to await the Kafka cluster materialization:

kubectl wait kafka/my-cluster --for=condition=Ready --timeout=300s -n kafka

Once the Kafka broker is up, the command will return and you’re ready to go.

A Simple PyFlink Job

With the operators for Flink and Kafka as well as a single-node Kafka cluster in place, let’s create a simple stream processing job using PyFlink. Inspired by the Python example job coming with the Flink Kubernetes operator, it uses the Flink DataGen SQL connector for creating random purchase orders. But instead of just printing them to sysout, we’re going to emit the stream of orders to a Kafka topic, using Flink's Apache Kafka SQL Connector.

<div class="side-note">In order to get started with setting up a PyFlink development environment on your local machine, check out this post by Robin Moffatt. In particular, make sure to use no Python version newer than 3.10 with PyFlink 1.18. At the time of writing, Python 3.11 is not supported yet, it is on the roadmap for PyFlink 1.19 (FLINK-33030).</div>

Here is the complete job:

import logging
import sys
import os

from pyflink.datastream import StreamExecutionEnvironment
from pyflink.table import StreamTableEnvironment

def pyflink_hello_world():
   env = StreamExecutionEnvironment.get_execution_environment()
   env.set_parallelism(1)

   t_env = StreamTableEnvironment.create(stream_execution_environment=env)

   kafka_jar = os.path.join(os.path.abspath(os.path.dirname(__file__)),
                           'flink-sql-connector-kafka-3.0.2-1.18.jar')

   t_env.get_config()\
           .get_configuration()\
           .set_string("pipeline.jars", "file://{}".format(kafka_jar))
  
   t_env.execute_sql("""
   CREATE TABLE orders (
     order_number BIGINT,
     price        DECIMAL(32,2),
     buyer        ROW,
     order_time   TIMESTAMP(3)
   ) WITH (
     'connector' = 'datagen',
     'rows-per-second' = '4'
   )""")
  
   t_env.execute_sql("""
   CREATE TABLE orders_sink (
     order_number BIGINT,
     price        DECIMAL(32,2),
     buyer        ROW,
     order_time   TIMESTAMP(3)
   ) WITH (
     'connector' = 'kafka',
     'topic' = 'orders',
     'properties.bootstrap.servers' = 'my-cluster-kafka-bootstrap.kafka.svc.cluster.local:9092',
     'properties.group.id' = 'orders-sink',
     'format' = 'json'
   )""")

   t_env.execute_sql("""
       INSERT INTO orders_sink SELECT * FROM orders""")


if __name__ == '__main__':
   logging.basicConfig(stream=sys.stdout, level=logging.INFO, format="%(message)s")
   pyflink_hello_world()
pyflink_hello_world.py (source)

<div style="text-align: center">Listing 1: pyflink_hello_world.py (source)</div>

The logic is fairly straightforward: A <span class="inline-code">StreamTableEnvironment</span> is created and the Flink SQL Kafka connector JAR is registered with it. Then two tables are created: a source table <span class="inline-code">orders</span>, based on the datagen connector, and a sink table <span class="inline-code">orders_sink</span>, based on the Kafka sink connector. Finally, an <span class="inline-code">INSERT</span> query is issued, which propagates any changed rows from the source to the sink table.

Building a Container Image With Your PyFlink Job

In order to deploy our PyFlink job onto Kubernetes, you’ll need to create a container image, containing the Python job itself and all its dependencies: PyFlink, any required Python packages, as well as any Flink connectors used by the job.

Unfortunately, the Dockerfile of the aforementioned Python example coming with the Flink Kubernetes operator didn’t quite work for me. When trying to build an image from it, I’d get the following error:

...
38.20 Collecting pemja==0.3.0
38.22   Downloading pemja-0.3.0.tar.gz (48 kB)
...
42.47   × Getting requirements to build wheel did not run successfully.
42.47   │ exit code: 255
42.47   ╰─> [1 lines of output]
42.47       Include folder should be at '/opt/java/openjdk/include' but doesn't exist. Please check you've installed the JDK properly.
42.47       [end of output]
...

The problem is that the upstream Flink container image which is used as a base image here, itself is derived from a JRE image for Java, i.e. it contains only a subset of all the modules provided by the Java platform. PemJa, one of PyFlink’s dependencies, requires some header files which only are provided by a complete JDK, though.

I have therefore created a new base image for PyFlink jobs, which removes the JRE and adds back the complete JDK, inspired by the equivalent step in the Dockerfile for creating the JDK 11 image provided by the Eclipse Temurin project. This is not quite ideal in terms of overall image size, and the cleaner approach would be to create a new image derived from the JDK one, but it does the trick for now to get going:

FROM flink:1.18.0

RUN rm -rf $JAVA_HOME
RUN /bin/sh -c set -eux; ARCH="$(dpkg --print-architecture)"; case "${ARCH}" in aarch64|arm64) ESUM='8c3146035b99c55ab26a2982f4b9abd2bf600582361cf9c732539f713d271faf'; BINARY_URL='https://github.com/adoptium/temurin11-binaries/releases/download/jdk-11.0.21%2B9/OpenJDK11U-jdk_aarch64_linux_hotspot_11.0.21_9.tar.gz'; ;; amd64|i386:x86-64) ESUM='60ea98daa09834fdd3162ca91ddc8d92a155ab3121204f6f643176ee0c2d0d5e'; BINARY_URL='https://github.com/adoptium/temurin11-binaries/releases/download/jdk-11.0.21%2B9/OpenJDK11U-jdk_x64_linux_hotspot_11.0.21_9.tar.gz'; ;; armhf|arm) ESUM='a64b005b84b173e294078fec34660ed3429d8c60726a5fb5c140e13b9e0c79fa'; BINARY_URL='https://github.com/adoptium/temurin11-binaries/releases/download/jdk-11.0.21%2B9/OpenJDK11U-jdk_arm_linux_hotspot_11.0.21_9.tar.gz'; ;; ppc64el|powerpc:common64) ESUM='262ff98d6d88a7c7cc522cb4ec4129491a0eb04f5b17dcca0da57cfcdcf3830d'; BINARY_URL='https://github.com/adoptium/temurin11-binaries/releases/download/jdk-11.0.21%2B9/OpenJDK11U-jdk_ppc64le_linux_hotspot_11.0.21_9.tar.gz'; ;; s390x|s390:64-bit) ESUM='bc67f79fb82c4131d9dcea32649c540a16aa380a9726306b9a67c5ec9690c492'; BINARY_URL='https://github.com/adoptium/temurin11-binaries/releases/download/jdk-11.0.21%2B9/OpenJDK11U-jdk_s390x_linux_hotspot_11.0.21_9.tar.gz'; ;; *) echo "Unsupported arch: ${ARCH}"; exit 1; ;; esac; wget --progress=dot:giga -O /tmp/openjdk.tar.gz ${BINARY_URL}; echo "${ESUM} */tmp/openjdk.tar.gz" | sha256sum -c -; mkdir -p "$JAVA_HOME"; tar --extract --file /tmp/openjdk.tar.gz --directory "$JAVA_HOME" --strip-components 1 --no-same-owner ; rm -f /tmp/openjdk.tar.gz ${JAVA_HOME}/lib/src.zip; find "$JAVA_HOME/lib" -name '*.so' -exec dirname '{}' ';' | sort -u > /etc/ld.so.conf.d/docker-openjdk.conf; ldconfig; java -Xshare:dump;

# install python3 and pip3
RUN apt-get update -y && \
 apt-get install -y python3 python3-pip python3-dev && \
 rm -rf /var/lib/apt/lists/*

# install PyFlink
RUN pip3 install apache-flink==1.18.0

<div style="text-align: center">Listing 2: Dockerfile.pyflink-base (source)</div>

Create an image from that Dockerfile and store it in your local container image registry:

docker build -f Dockerfile.pyflink-base . -t decodable-examples/pyflink-base:latest

As for the actual image with our job, all that remains needed to be done is to extend that base image and add the Python job with all its dependencies (in this case, just the Kafka connector):

FROM decodable-examples/pyflink-base:latest

RUN wget -P /opt/flink/usrlib https://repo.maven.apache.org/maven2/org/apache/flink/flink-sql-connector-kafka/3.0.2-1.18/flink-sql-connector-kafka-3.0.2-1.18.jar
ADD --chown=flink:flink python_demo.py /opt/flink/usrlib/pyflink_hello_world.py

<div style="text-align: center">Listing 3: Dockerfile (source)</div>

Let’s also build an image for that:

docker build -f Dockerfile . -t decodable-examples/pyflink-hello-world:latest

In order to use that image from within Kubernetes, you’ll finally need to load it into the cluster, which can be done with <span class="inline-code">kind</span> like this:

kind load docker-image decodable-examples/pyflink-hello-world:latest –name pyflink-test

Deploying a PyFlink Job On Kubernetes

At this point, you have everything in place for deploying your PyFlink job to Kubernetes. The operator project comes with an example resource of type <span class="inline-code">FlinkDeployment</span>, which works pretty much as-is for our purposes. Only the image name and the Flink version need to be changed to the image you’ve just created:

apiVersion: flink.apache.org/v1beta1
kind: FlinkDeployment
metadata:
 name: pyflink-hello-world
spec:
 image: decodable-examples/pyflink-hello-world:latest
 flinkVersion: v1_18
 flinkConfiguration:
   taskmanager.numberOfTaskSlots: "1"
 serviceAccount: flink
 jobManager:
   resource:
     memory: "2048m"
     cpu: 1
 taskManager:
   resource:
     memory: "2048m"
     cpu: 1
 job:
   jarURI: local:///opt/flink/opt/flink-python-1.18.0.jar
   entryClass: "org.apache.flink.client.python.PythonDriver"
   args: ["-pyclientexec", "/usr/bin/python3", "-py", "/opt/flink/usrlib/pyflink_hello_world.py"]
   parallelism: 1
   upgradeMode: stateless

<div style="text-align: center">Listing 4: pyflink-hello-world.yaml (source)</div>

Note how the <span class="inline-code">PythonDriver</span> class is used as the entry point for running a PyFlink job and the job to run is passed in via the <span class="inline-code">-py</span> argument. Just as any other Kubernetes resource, this Flink job can be deployed using <span class="inline-code">kubectl</span>:

kubectl create -f pyflink-hello-world.yaml

The operator will pick up that resource definition and spin up the corresponding pods with the Flink job and task manager for running this job. As before, you can await the creation of the job:

kubectl wait FlinkDeployment/python-example --for=jsonpath='{.status.jobStatus.state}'=RUNNING --timeout=300s

As the last step, you can check out the Kafka topic, confirming that the job propagates all the orders from the datagen source to the Kafka sink as expected:

kubectl -n kafka run kafka-consumer -ti --rm=true --restart=Never \
  --image=quay.io/strimzi/kafka:0.38.0-kafka-3.6.0 -- \
  bin/kafka-console-consumer.sh --bootstrap-server \
  my-cluster-kafka-bootstrap.kafka:9092 --topic orders
  
{"order_number":1574206908793601022,"price":824651156650254403841457913856,"buyer":{"first_name":"3ffbd66e114b1d26e08181bd8c248aac514b812bce11ebaf11b3f2ee8941d0df3feea556bced4c07bd040bac4da53af1774b","last_name":"24eb04e10e90a4e1717dd5afa574eb964775466e22f725a6d603d1723f27d2616d095792cfaf5f83815c728b6eb0a961c673"},"order_time":"2023-12-06 09:11:10.397"}
{"order_number":4306245129932523235,"price":966772426991501079169688666112,"buyer":{"first_name":"c7d08f3d15b2e993b6e12be76a891b1e367a5a841850375142ee4b2b62dc2a1541a94b16267f568f0ada8c3e97963f346745","last_name":"2d80bb118ca512c1a7aa5a9bfcf651b62521de8489ea7a80554723625674e000153e3a37f652ce1137df4dc154e573fd09ce"},"order_time":"2023-12-06 09:11:10.397"}

You also can take a look at the deployed job in the Flink web UI by forwarding the REST port from the job manager:

kubectl port-forward service/python-hello-world-rest 8081:rest

This makes the Flink Dashboard accessible at http://localhost:8081, allowing you to take a look at the job’s health status, metrics, etc.:
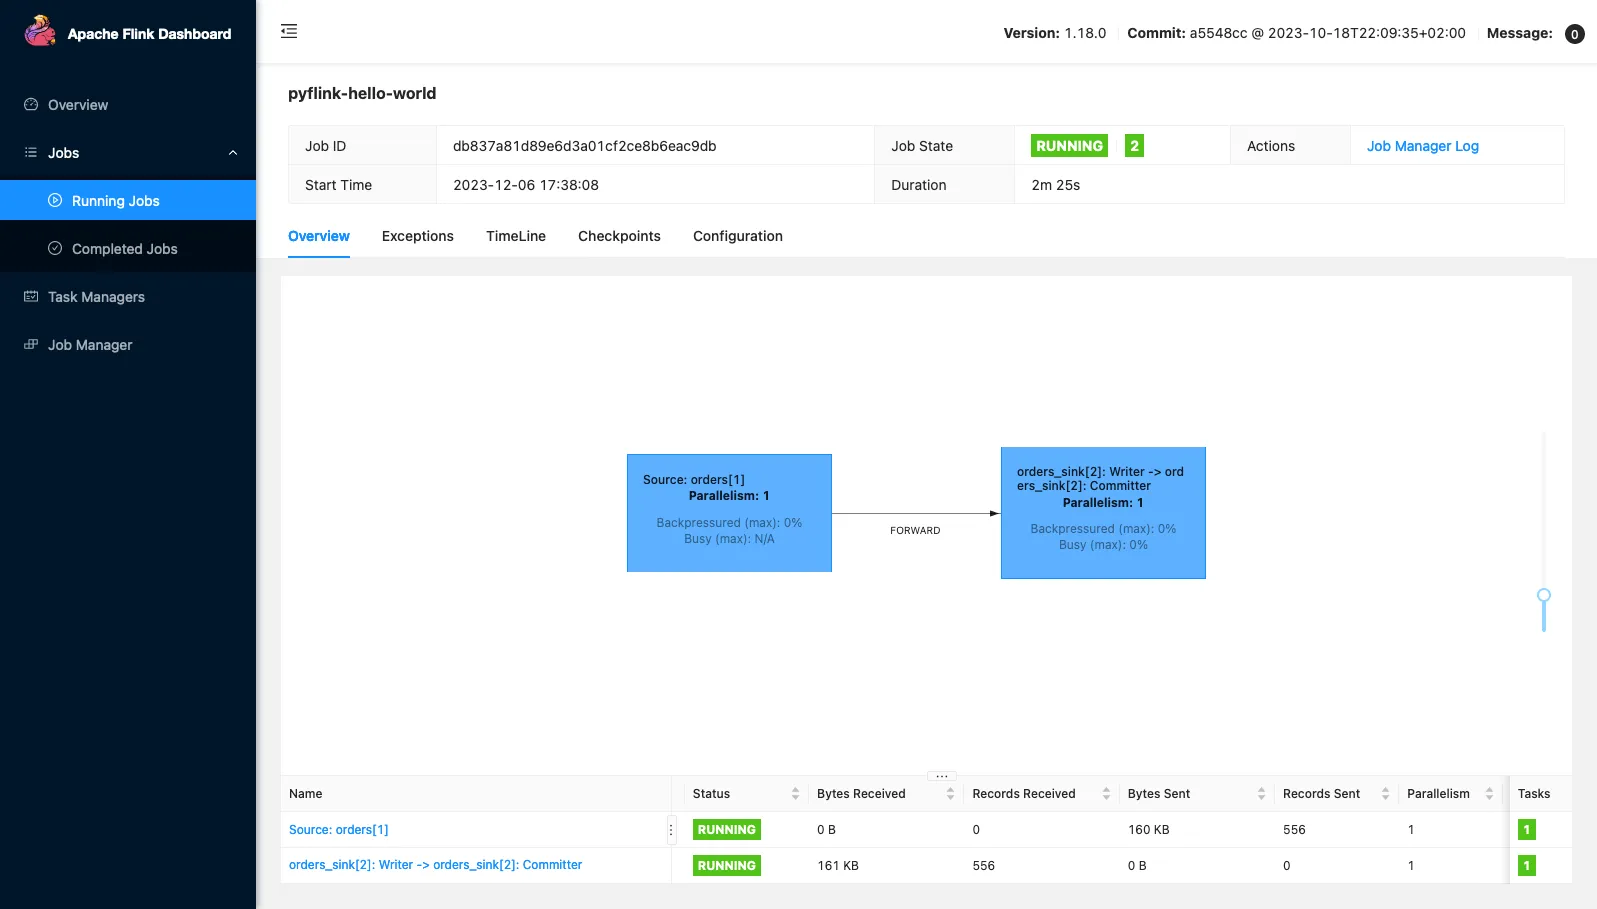
Fig. 2: PyFlink job in the Apache Flink Dashboard (click to enlarge)

Finally, to stop your job, simply delete its resource definition:

kubectl delete -f python-hello-world.yaml

And there you have it—Your first PyFlink job running on Kubernetes 🎉. To try everything out yourself, you can find the complete source code in our examples repository on GitHub. Happy PyFlink-ing!

Many thanks to Robert Metzger and Robin Moffatt for their feedback while writing this post.

📫 Email signup 👇

Did you enjoy this issue of Checkpoint Chronicle? Would you like the next edition delivered directly to your email to read from the comfort of your own home?

Simply enter your email address here and we'll send you the next issue as soon as it's published—and nothing else, we promise!

👍 Got it!
Oops! Something went wrong while submitting the form.
Gunnar Morling

Gunnar is an open-source enthusiast at heart, currently working on Apache Flink-based stream processing. In his prior role as a software engineer at Red Hat, he led the Debezium project, a distributed platform for change data capture. He is a Java Champion and has founded multiple open source projects such as JfrUnit, kcctl, and MapStruct.

Table of contents

Let's Get Decoding

The other day, I wanted to get my feet wet with PyFlink. While there is a fair amount of related information out there, I couldn’t find really up-to-date documentation on using current versions of PyFlink with Flink on Kubernetes.

Kubernetes is the common go-to platform for running Flink at scale in production these days, allowing you to deploy and operate Flink jobs efficiently and securely, providing high availability, observability, features such as auto-scaling, and much more. All of which are good reasons for running PyFlink jobs on Kubernetes, too, and so I thought I’d provide a quick run-through of the required steps for getting started with PyFlink on Kubernetes as of Apache Flink 1.18.

In the remainder of this blog post, I’m going to explore how to

  • install Flink and its Kubernetes operator on a local Kubernetes cluster,
  • install Kafka on the same cluster, using the Strimzi operator,
  • create a PyFlink job which creates some random data using Flink’s DataGen connector and writes that data to a Kafka topic using Flink SQL, and
  • deploy and run that job to Kubernetes.

The overall solution is going to look like this:

Fig.1: Solution Overview (click to enlarge)

What Is PyFlink and Why Should You Care?

In a nutshell, PyFlink is the Python-based API to Apache Flink. Per the docs, it enables you to

“build scalable batch and streaming workloads, such as real-time data processing pipelines, large-scale exploratory data analysis, Machine Learning (ML) pipelines and ETL processes”.

It is particularly useful for development teams who are more familiar with Python than with Java and who still would like to benefit from Flink’s powerful stream processing capabilities. Another factor is Python’s rich 3rd party ecosystem: not only does it provide libraries for data engineering (e.g. Pandas) and scientific computing (e.g. NumPy), but also for ML and AI (e.g. PyTorch and TensorFlow), which makes PyFlink the ideal link between these fields and real-time stream processing. So if for instance you wanted to train your ML models on real time event data sourced from your production RDBMS, doing some data cleaning, filtering, and aggregation along the way, PyFlink would be a great option.

Similar to Flink’s Java APIs, PyFlink comes with a DataStream API and a Table API. The former lets you implement operations such as filtering and mapping, joining, grouping and aggregation, and much more on data streams, providing you with a large degree of freedom and control over aspects such as state management, late event handling, or output control. In contrast, the Table API offers a more rigid but also easier-to-use and less verbose relational programming interface, including support for defining stream processing pipelines using SQL, benefitting from automatic optimizations by Flink’s query planner.

Implementation-wise, PyFlink acts as a wrapper around Flink’s Java APIs. Upon start-up, the job graph is retrieved from the Python job using Py4J, a bridge between the Python VM and the JVM. It then gets transformed into an equivalent job running on the Flink cluster. At runtime, Flink will call back to the Python VM for executing any Python-based user-defined functions (UDFs) with the help of the Apache Beam portability framework. As of Flink 1.15, there’s also support for a new execution mode called “thread mode”, where Python code is executed on the JVM itself (via JNI), avoiding the overhead of cross-process communication.

Prerequisites

So let’s set up a Kubernetes cluster and install the aforementioned operators onto it. To follow along, make sure to have the following things installed on your machine:

  • Docker, for creating and running containers
  • kind, for setting up a local Kubernetes cluster (of course you could also use alternatives such as MiniKube or a managed cluster on EKS or GKE, etc.)
  • helm, for installing software into the cluster
  • kubectl, for interacting with Kubernetes

Begin by creating a new cluster with one control plane and one worker node via kind:

{ cat | kind create cluster --name pyflink-test --config -; } << EOF
kind: Cluster
apiVersion: kind.x-k8s.io/v1alpha4
nodes:
  - role: control-plane
  - role: worker
EOF

After a minute or so, the Kubernetes cluster should be ready, and you can take a look at its nodes with kubectl:

kubectl get nodes
NAME                          STATUS ROLES          AGE  VERSION
pyflink-test-2-control-plane  Ready  control-plane  67s  v1.27.3
pyflink-test-2-worker         Ready           48s  v1.27.3

Installing the Flink Kubernetes Operator

Next, install the Flink Kubernetes Operator. Official part of the Flink project, its task will be to deploy and run Flink jobs on Kubernetes, based on custom resource definitions. It is installed using a Helm chart, using the following steps (refer to the upstream documentation for more details):

  1. Deploy the certificate manager (required later on when the operator’s webhook is invoked during the creation of custom resources): <span class="inline-code">kubectl create -f https://github.com/cert-manager/cert-manager/releases/download/v1.8.2/cert-manager.yaml</span>
  2. Add the Helm repository for the operator: <span class="inline-code">helm repo add flink-operator-repo https://downloads.apache.org/flink/flink-kubernetes-operator-1.7.0/</span>
  3. Install the operator using the provided Helm chart: <span class="inline-code">helm install flink-kubernetes-operator flink-operator-repo/flink-kubernetes-operator</span>

After a short time, a Kubernetes pod with the operator should be running on the cluster:

kubectl get pods
NAME                                     READY  STATUS   RESTARTS  AGE
flink-kubernetes-operator-f4bbff6-jtd4x  2/2    Running  0         0h17m

Installing Strimzi and Apache Kafka

With the Flink Kubernetes Operator up and running, it’s time to install Strimzi. It is another Kubernetes Operator, in this case in charge of deploying and running Kafka clusters. Strimzi is a very powerful tool, supporting all kinds of Kafka deployments, Kafka Connect, MirrorMaker2, and much more. We are going to use it for installing a simple one node Kafka cluster, following the steps from Strimzi’s quickstart guide:

  1. Create a Kubernetes namespace for Strimzi and Kafka:
    <span class="inline-code">kubectl create namespace kafka</span>
  2. Install Strimzi into that namespace:
    <span class="inline-code">kubectl create -f 'https://strimzi.io/install/latest?namespace=kafka' -n kafka</span>
  3. Create a Kafka cluster:
    <span class="inline-code">kubectl apply -f https://strimzi.io/examples/latest/kafka/kafka-persistent-single.yaml -n kafka</span>

Again this will take some time to complete. You can use the <span class="inline-code">wait</span> command to await the Kafka cluster materialization:

kubectl wait kafka/my-cluster --for=condition=Ready --timeout=300s -n kafka

Once the Kafka broker is up, the command will return and you’re ready to go.

A Simple PyFlink Job

With the operators for Flink and Kafka as well as a single-node Kafka cluster in place, let’s create a simple stream processing job using PyFlink. Inspired by the Python example job coming with the Flink Kubernetes operator, it uses the Flink DataGen SQL connector for creating random purchase orders. But instead of just printing them to sysout, we’re going to emit the stream of orders to a Kafka topic, using Flink's Apache Kafka SQL Connector.

<div class="side-note">In order to get started with setting up a PyFlink development environment on your local machine, check out this post by Robin Moffatt. In particular, make sure to use no Python version newer than 3.10 with PyFlink 1.18. At the time of writing, Python 3.11 is not supported yet, it is on the roadmap for PyFlink 1.19 (FLINK-33030).</div>

Here is the complete job:

import logging
import sys
import os

from pyflink.datastream import StreamExecutionEnvironment
from pyflink.table import StreamTableEnvironment

def pyflink_hello_world():
   env = StreamExecutionEnvironment.get_execution_environment()
   env.set_parallelism(1)

   t_env = StreamTableEnvironment.create(stream_execution_environment=env)

   kafka_jar = os.path.join(os.path.abspath(os.path.dirname(__file__)),
                           'flink-sql-connector-kafka-3.0.2-1.18.jar')

   t_env.get_config()\
           .get_configuration()\
           .set_string("pipeline.jars", "file://{}".format(kafka_jar))
  
   t_env.execute_sql("""
   CREATE TABLE orders (
     order_number BIGINT,
     price        DECIMAL(32,2),
     buyer        ROW,
     order_time   TIMESTAMP(3)
   ) WITH (
     'connector' = 'datagen',
     'rows-per-second' = '4'
   )""")
  
   t_env.execute_sql("""
   CREATE TABLE orders_sink (
     order_number BIGINT,
     price        DECIMAL(32,2),
     buyer        ROW,
     order_time   TIMESTAMP(3)
   ) WITH (
     'connector' = 'kafka',
     'topic' = 'orders',
     'properties.bootstrap.servers' = 'my-cluster-kafka-bootstrap.kafka.svc.cluster.local:9092',
     'properties.group.id' = 'orders-sink',
     'format' = 'json'
   )""")

   t_env.execute_sql("""
       INSERT INTO orders_sink SELECT * FROM orders""")


if __name__ == '__main__':
   logging.basicConfig(stream=sys.stdout, level=logging.INFO, format="%(message)s")
   pyflink_hello_world()
pyflink_hello_world.py (source)

<div style="text-align: center">Listing 1: pyflink_hello_world.py (source)</div>

The logic is fairly straightforward: A <span class="inline-code">StreamTableEnvironment</span> is created and the Flink SQL Kafka connector JAR is registered with it. Then two tables are created: a source table <span class="inline-code">orders</span>, based on the datagen connector, and a sink table <span class="inline-code">orders_sink</span>, based on the Kafka sink connector. Finally, an <span class="inline-code">INSERT</span> query is issued, which propagates any changed rows from the source to the sink table.

Building a Container Image With Your PyFlink Job

In order to deploy our PyFlink job onto Kubernetes, you’ll need to create a container image, containing the Python job itself and all its dependencies: PyFlink, any required Python packages, as well as any Flink connectors used by the job.

Unfortunately, the Dockerfile of the aforementioned Python example coming with the Flink Kubernetes operator didn’t quite work for me. When trying to build an image from it, I’d get the following error:

...
38.20 Collecting pemja==0.3.0
38.22   Downloading pemja-0.3.0.tar.gz (48 kB)
...
42.47   × Getting requirements to build wheel did not run successfully.
42.47   │ exit code: 255
42.47   ╰─> [1 lines of output]
42.47       Include folder should be at '/opt/java/openjdk/include' but doesn't exist. Please check you've installed the JDK properly.
42.47       [end of output]
...

The problem is that the upstream Flink container image which is used as a base image here, itself is derived from a JRE image for Java, i.e. it contains only a subset of all the modules provided by the Java platform. PemJa, one of PyFlink’s dependencies, requires some header files which only are provided by a complete JDK, though.

I have therefore created a new base image for PyFlink jobs, which removes the JRE and adds back the complete JDK, inspired by the equivalent step in the Dockerfile for creating the JDK 11 image provided by the Eclipse Temurin project. This is not quite ideal in terms of overall image size, and the cleaner approach would be to create a new image derived from the JDK one, but it does the trick for now to get going:

FROM flink:1.18.0

RUN rm -rf $JAVA_HOME
RUN /bin/sh -c set -eux; ARCH="$(dpkg --print-architecture)"; case "${ARCH}" in aarch64|arm64) ESUM='8c3146035b99c55ab26a2982f4b9abd2bf600582361cf9c732539f713d271faf'; BINARY_URL='https://github.com/adoptium/temurin11-binaries/releases/download/jdk-11.0.21%2B9/OpenJDK11U-jdk_aarch64_linux_hotspot_11.0.21_9.tar.gz'; ;; amd64|i386:x86-64) ESUM='60ea98daa09834fdd3162ca91ddc8d92a155ab3121204f6f643176ee0c2d0d5e'; BINARY_URL='https://github.com/adoptium/temurin11-binaries/releases/download/jdk-11.0.21%2B9/OpenJDK11U-jdk_x64_linux_hotspot_11.0.21_9.tar.gz'; ;; armhf|arm) ESUM='a64b005b84b173e294078fec34660ed3429d8c60726a5fb5c140e13b9e0c79fa'; BINARY_URL='https://github.com/adoptium/temurin11-binaries/releases/download/jdk-11.0.21%2B9/OpenJDK11U-jdk_arm_linux_hotspot_11.0.21_9.tar.gz'; ;; ppc64el|powerpc:common64) ESUM='262ff98d6d88a7c7cc522cb4ec4129491a0eb04f5b17dcca0da57cfcdcf3830d'; BINARY_URL='https://github.com/adoptium/temurin11-binaries/releases/download/jdk-11.0.21%2B9/OpenJDK11U-jdk_ppc64le_linux_hotspot_11.0.21_9.tar.gz'; ;; s390x|s390:64-bit) ESUM='bc67f79fb82c4131d9dcea32649c540a16aa380a9726306b9a67c5ec9690c492'; BINARY_URL='https://github.com/adoptium/temurin11-binaries/releases/download/jdk-11.0.21%2B9/OpenJDK11U-jdk_s390x_linux_hotspot_11.0.21_9.tar.gz'; ;; *) echo "Unsupported arch: ${ARCH}"; exit 1; ;; esac; wget --progress=dot:giga -O /tmp/openjdk.tar.gz ${BINARY_URL}; echo "${ESUM} */tmp/openjdk.tar.gz" | sha256sum -c -; mkdir -p "$JAVA_HOME"; tar --extract --file /tmp/openjdk.tar.gz --directory "$JAVA_HOME" --strip-components 1 --no-same-owner ; rm -f /tmp/openjdk.tar.gz ${JAVA_HOME}/lib/src.zip; find "$JAVA_HOME/lib" -name '*.so' -exec dirname '{}' ';' | sort -u > /etc/ld.so.conf.d/docker-openjdk.conf; ldconfig; java -Xshare:dump;

# install python3 and pip3
RUN apt-get update -y && \
 apt-get install -y python3 python3-pip python3-dev && \
 rm -rf /var/lib/apt/lists/*

# install PyFlink
RUN pip3 install apache-flink==1.18.0

<div style="text-align: center">Listing 2: Dockerfile.pyflink-base (source)</div>

Create an image from that Dockerfile and store it in your local container image registry:

docker build -f Dockerfile.pyflink-base . -t decodable-examples/pyflink-base:latest

As for the actual image with our job, all that remains needed to be done is to extend that base image and add the Python job with all its dependencies (in this case, just the Kafka connector):

FROM decodable-examples/pyflink-base:latest

RUN wget -P /opt/flink/usrlib https://repo.maven.apache.org/maven2/org/apache/flink/flink-sql-connector-kafka/3.0.2-1.18/flink-sql-connector-kafka-3.0.2-1.18.jar
ADD --chown=flink:flink python_demo.py /opt/flink/usrlib/pyflink_hello_world.py

<div style="text-align: center">Listing 3: Dockerfile (source)</div>

Let’s also build an image for that:

docker build -f Dockerfile . -t decodable-examples/pyflink-hello-world:latest

In order to use that image from within Kubernetes, you’ll finally need to load it into the cluster, which can be done with <span class="inline-code">kind</span> like this:

kind load docker-image decodable-examples/pyflink-hello-world:latest –name pyflink-test

Deploying a PyFlink Job On Kubernetes

At this point, you have everything in place for deploying your PyFlink job to Kubernetes. The operator project comes with an example resource of type <span class="inline-code">FlinkDeployment</span>, which works pretty much as-is for our purposes. Only the image name and the Flink version need to be changed to the image you’ve just created:

apiVersion: flink.apache.org/v1beta1
kind: FlinkDeployment
metadata:
 name: pyflink-hello-world
spec:
 image: decodable-examples/pyflink-hello-world:latest
 flinkVersion: v1_18
 flinkConfiguration:
   taskmanager.numberOfTaskSlots: "1"
 serviceAccount: flink
 jobManager:
   resource:
     memory: "2048m"
     cpu: 1
 taskManager:
   resource:
     memory: "2048m"
     cpu: 1
 job:
   jarURI: local:///opt/flink/opt/flink-python-1.18.0.jar
   entryClass: "org.apache.flink.client.python.PythonDriver"
   args: ["-pyclientexec", "/usr/bin/python3", "-py", "/opt/flink/usrlib/pyflink_hello_world.py"]
   parallelism: 1
   upgradeMode: stateless

<div style="text-align: center">Listing 4: pyflink-hello-world.yaml (source)</div>

Note how the <span class="inline-code">PythonDriver</span> class is used as the entry point for running a PyFlink job and the job to run is passed in via the <span class="inline-code">-py</span> argument. Just as any other Kubernetes resource, this Flink job can be deployed using <span class="inline-code">kubectl</span>:

kubectl create -f pyflink-hello-world.yaml

The operator will pick up that resource definition and spin up the corresponding pods with the Flink job and task manager for running this job. As before, you can await the creation of the job:

kubectl wait FlinkDeployment/python-example --for=jsonpath='{.status.jobStatus.state}'=RUNNING --timeout=300s

As the last step, you can check out the Kafka topic, confirming that the job propagates all the orders from the datagen source to the Kafka sink as expected:

kubectl -n kafka run kafka-consumer -ti --rm=true --restart=Never \
  --image=quay.io/strimzi/kafka:0.38.0-kafka-3.6.0 -- \
  bin/kafka-console-consumer.sh --bootstrap-server \
  my-cluster-kafka-bootstrap.kafka:9092 --topic orders
  
{"order_number":1574206908793601022,"price":824651156650254403841457913856,"buyer":{"first_name":"3ffbd66e114b1d26e08181bd8c248aac514b812bce11ebaf11b3f2ee8941d0df3feea556bced4c07bd040bac4da53af1774b","last_name":"24eb04e10e90a4e1717dd5afa574eb964775466e22f725a6d603d1723f27d2616d095792cfaf5f83815c728b6eb0a961c673"},"order_time":"2023-12-06 09:11:10.397"}
{"order_number":4306245129932523235,"price":966772426991501079169688666112,"buyer":{"first_name":"c7d08f3d15b2e993b6e12be76a891b1e367a5a841850375142ee4b2b62dc2a1541a94b16267f568f0ada8c3e97963f346745","last_name":"2d80bb118ca512c1a7aa5a9bfcf651b62521de8489ea7a80554723625674e000153e3a37f652ce1137df4dc154e573fd09ce"},"order_time":"2023-12-06 09:11:10.397"}

You also can take a look at the deployed job in the Flink web UI by forwarding the REST port from the job manager:

kubectl port-forward service/python-hello-world-rest 8081:rest

This makes the Flink Dashboard accessible at http://localhost:8081, allowing you to take a look at the job’s health status, metrics, etc.:

Fig. 2: PyFlink job in the Apache Flink Dashboard (click to enlarge)

Finally, to stop your job, simply delete its resource definition:

kubectl delete -f python-hello-world.yaml

And there you have it—Your first PyFlink job running on Kubernetes 🎉. To try everything out yourself, you can find the complete source code in our examples repository on GitHub. Happy PyFlink-ing!

Many thanks to Robert Metzger and Robin Moffatt for their feedback while writing this post.

📫 Email signup 👇

Did you enjoy this issue of Checkpoint Chronicle? Would you like the next edition delivered directly to your email to read from the comfort of your own home?

Simply enter your email address here and we'll send you the next issue as soon as it's published—and nothing else, we promise!

👍 Got it!
Oops! Something went wrong while submitting the form.
Gunnar Morling

Gunnar is an open-source enthusiast at heart, currently working on Apache Flink-based stream processing. In his prior role as a software engineer at Red Hat, he led the Debezium project, a distributed platform for change data capture. He is a Java Champion and has founded multiple open source projects such as JfrUnit, kcctl, and MapStruct.

Let's Get Decoding