.svg)
.webp)


TLS
Transport Layer Security (TLS) is a cryptographic protocol that allows clients and servers to communicate securely. It does so by encrypting the data before it travels over the network so that bad actors cannot read it. This process also allows for the recipient to decrypt the data so that it could be programmatically understood. TLS is the improved successor to the SSL protocol. The terms TLS and SSL are often used interchangeably in the industry today.
Mutual TLS (mTLS)
You can also configure TLS for client authentication, which is usually known as 2-way authentication or mutual TLS or just mTLS. The difference between TLS and mTLS is that TLS is used for encryption and mTLS is used for encryption and authentication.
In TLS, only the broker has signed certificates. The client verifies the broker certificates to create an encrypted connection. Most importantly the clients were “anonymous”.
In mTLS, the connection is still encrypted but both the broker and client now have signed certificates. Also both broker and client verify each other’s certificates. The client certificate provides an identity and is no longer anonymous.
Having an identity allows you to create ACLs (access control lists) that can be used to limit or grant access to topics in Kafka. In this post, we will only be configuring Apache Kafka (server) and Decodable (client) to communicate over mTLS.
Certificate Authority
This process of configuring mTLS communication starts with a certificate authority. A certificate authority (CA) is an entity that stores, signs, and issues digital certificates. Simply it is a trusted organization that verifies websites (and other entities) so that you know who you're communicating with online. (Casey Crane, thesslstore.com)
Popular CAs available today include: Add Trust, Actalis, Certum, Verisign, Comodo, and DigiCert
In this post, we will be acting as our own CA. We can do this by using the openssl command line tool. The command below outputs two files: ca-key and ca-cert and places them in a directory called ssl.
Here is a sample of the contents of the ca-cert.
-----BEGIN CERTIFICATE-----
XXXXtDCCAZwCCQD12TLEY/3DDDANBgkqhkiG9w0BAQsFADAcMRowGAYDVQQDDBFz
...
K8BvIOc1O5rUdxxHQd7Lhfc5ZKHJzXVl
-----END CERTIFICATE-----
Here is a sample of the contents of the ca-key.
-----BEGIN PRIVATE KEY-----
XXXXXQIBADANBgkqhkiG9w0BAQEFAASCBKcwggSjAgEAAoIBAQCudORcrFswXD3W
....
2OCJj8MsXYdCobH3G870O/I=
-----END PRIVATE KEY-----
These two files represent your CA and will now allow you to sign digital certificates.
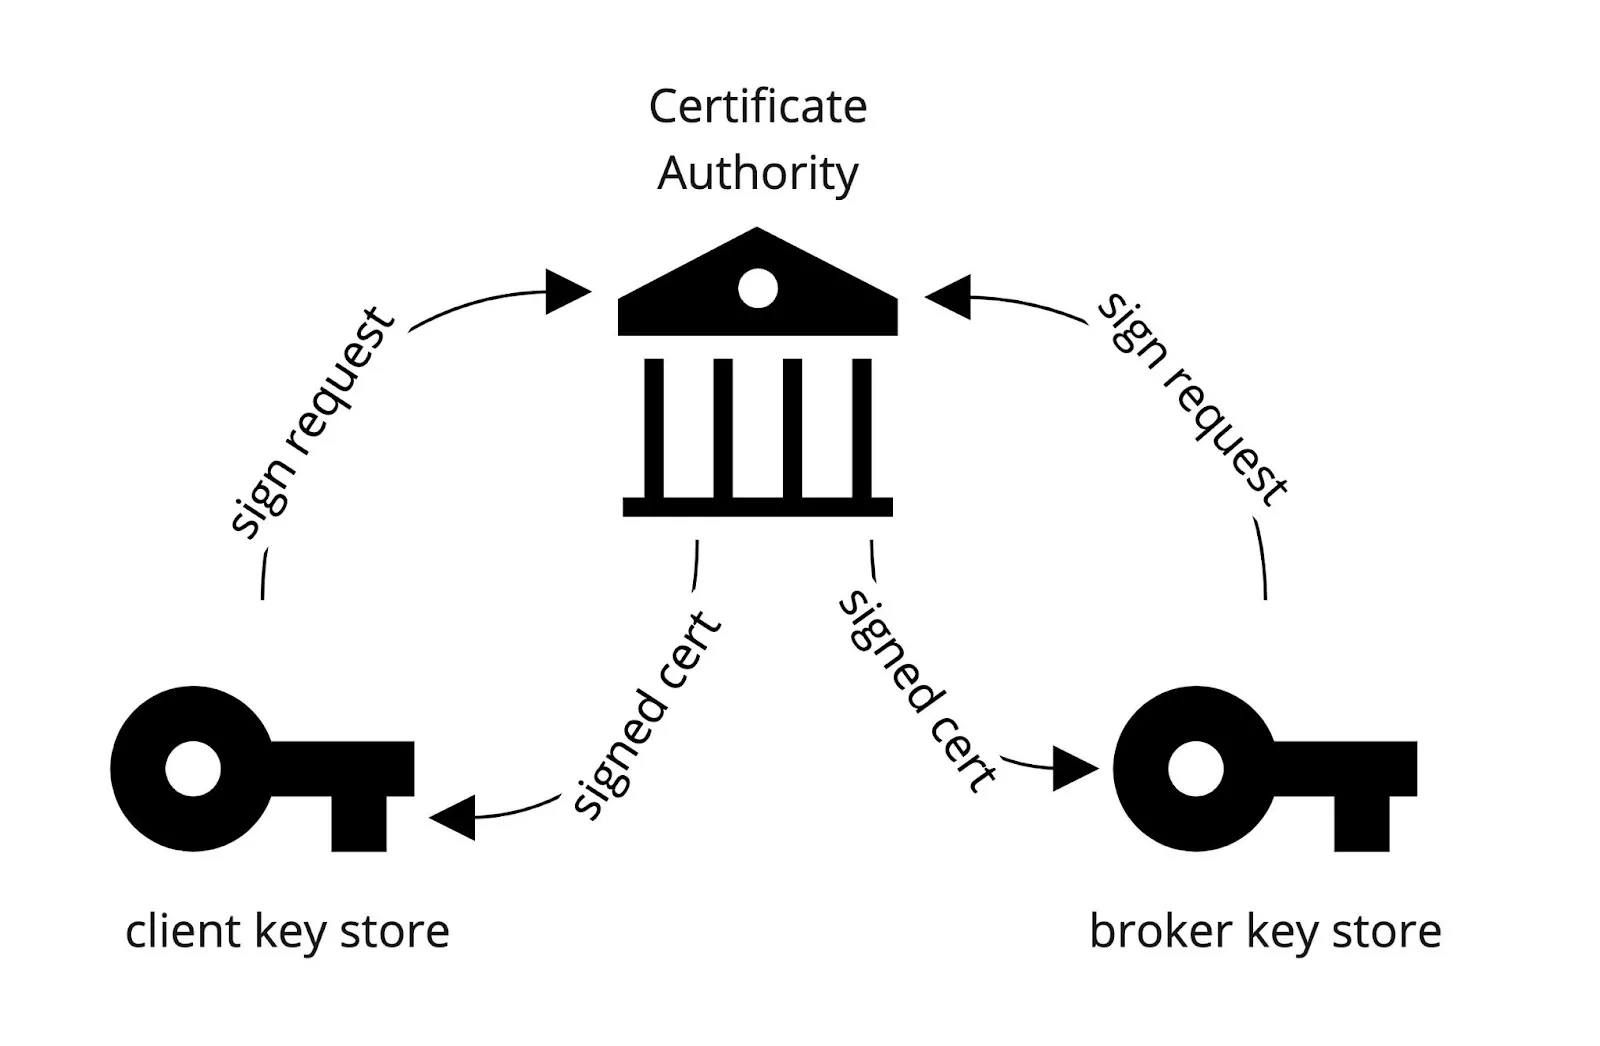
Truststores
Since again we are acting as our own CA, both the client and server need to trust the CA. We accomplish this by placing the CA certificate into a trust store located at the Kafka client (client) and another at the Kafka broker (server). See the diagram below.
The command below uses the keytool command to import the ca-cert we generated from the last section into the client or server. You will need to execute this command twice where the value of $(client/server) is either “client” or “server”.
The output for these two executions are two binary files: kafka.client.truststore.jks and kafka.server.truststore.jks. The truststores should be copied to their respective locations for local access - client truststore to the client and likewise the server truststore to the server.
Keystores and Signing Certificates
The next step is to create a keystore for both the client and server. A keystore is a repository for private keys and identity certificates. This keystore will allow you to create a request to sign a certificate for the client or server. Here is the command.
This command needs to be invoked for each client and server and creates the binary files kafka.server.keystore.jks and kafka.client.keystore.jks files. These files should be placed in their respective locations.
Next we need to request to sign a certificate. The command below creates a client/server-cert-request file.
The contents of the client-cert-request and server-cert-request looks like this.
-----BEGIN NEW CERTIFICATE REQUEST-----
XXXsTCCAZkCAQAwPDE6MDgGA1UEAxMxZWMyLTM1LTkwLTE3OC0xNTAudXMtd2Vz
…
dRmtSVy5Qo4JqcHgi3cAiS9szY33
-----END NEW CERTIFICATE REQUEST-----
Normally these files would get sent to the CA to get signed but since we are acting as our own CA, we can sign it ourselves. The command below takes the CA files: ca-cert and ca-key and takes the certificate request to generate a signed certificate file. This is the signed certificate for the broker which we will also use to configure a Decodable Kafka source connection later.
Next we need to import both the ca-cert and the signed certificate into each of the keystores.
Command and File Summary
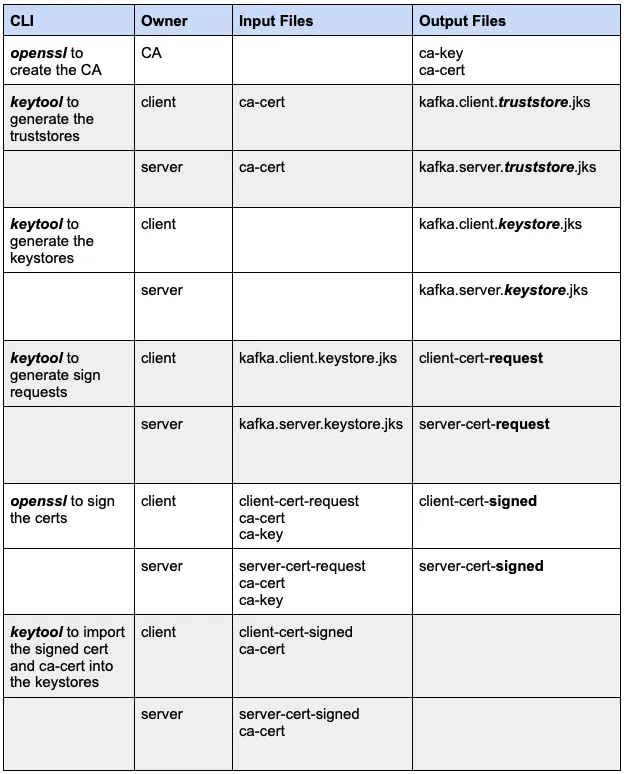
The client should have two files to use to connect to Kafka:
- kafka.client.truststore.jks
- kafka.client.keystore.jks
The server (broker) should also have two files:
- kafka.server.truststore.jks
- kafka.server.keystore.jks
Next we will configure the server and client to use these files to establish a secure connection.
Configuration
Server
In the Kafka broker configuration file server.properties, you will need to add the following properties:
listeners=PLAINTEXT://0.0.0.0:9092,SSL://0.0.0.0:9093
advertised.listeners=PLAINTEXT://<HOSTNAME>:9092,SSL://<HOSTNAME>:9093
ssl.keystore.location=<path>/kafka.server.keystore.jks
ssl.keystore.password=yourpassword
ssl.key.password=yourpassword
ssl.truststore.location=<path>/kafka.server.truststore.jks
ssl.truststore.password=yourpassword
Provide the path to the server keystore and truststore and their passwords. You will also need to add an entry to both the listeners and advertised.listeners that specifies the SSL as the protocol to use. Notice we 9092 is an unsecured port and 9093 is a secured port.
You will need to do this for every Kafka broker. Each Kafka broker should also have its own keystore and truststore. Once this is done, you’ll need to perform a rolling restart of all the brokers in the Kafka cluster. In our case, we only have 1 broker.
You can verify your mTLS broker configuration by executing the following:
openssl s_client -connect ${BROKER_HOST}:9093
The output should show the broker certificate.
Client
Below is a client configuration to produce to or consume from Kafka. Create a file called client.properties and set the keystore and truststore locations to the locations on the client machine.
security.protocol=SSL
ssl.truststore.location=/etc/ssl/kafka.client.truststore.jks
ssl.truststore.password=MY_PASSWORD
ssl.keystore.location=/etc/ssl/kafka.client.keystore.jks
ssl.keystore.password=MY_PASSWORD
ssl.key.password=MY_PASSWORD
ssl.endpoint.identification.algorithm=
Notice the ssl.endpoint.identification.algorithm is set to null or empty string. This property is used to control host name verification. Host name verification of servers is enabled by default for client connections as well as inter-broker connections to prevent man-in-the-middle attacks. Clients can disable this setting if you don’t want this feature. Especially when you’re still in the development phase. For production, it’s best practice to set this property to https (the default value). If you do, you need to make sure that the SAN or CN are set. The command below is an alternative way to create a keystore by providing a SAN. We will not be doing this in this post.
keytool -keystore server.keystore.jks -alias localhost -validity {validity} -genkey -keyalg RSA -ext SAN=DNS:{FQDN}
To consume from or produce to Kafka, you can use the kafka-console-consumer or kafka-console-producer that comes with Kafka. You can also set a property to output ssl debug messages. See examples below.
Next we’ll configure a Decodable source connection to read data from a secured Apache Kafka.
Decodable Connection
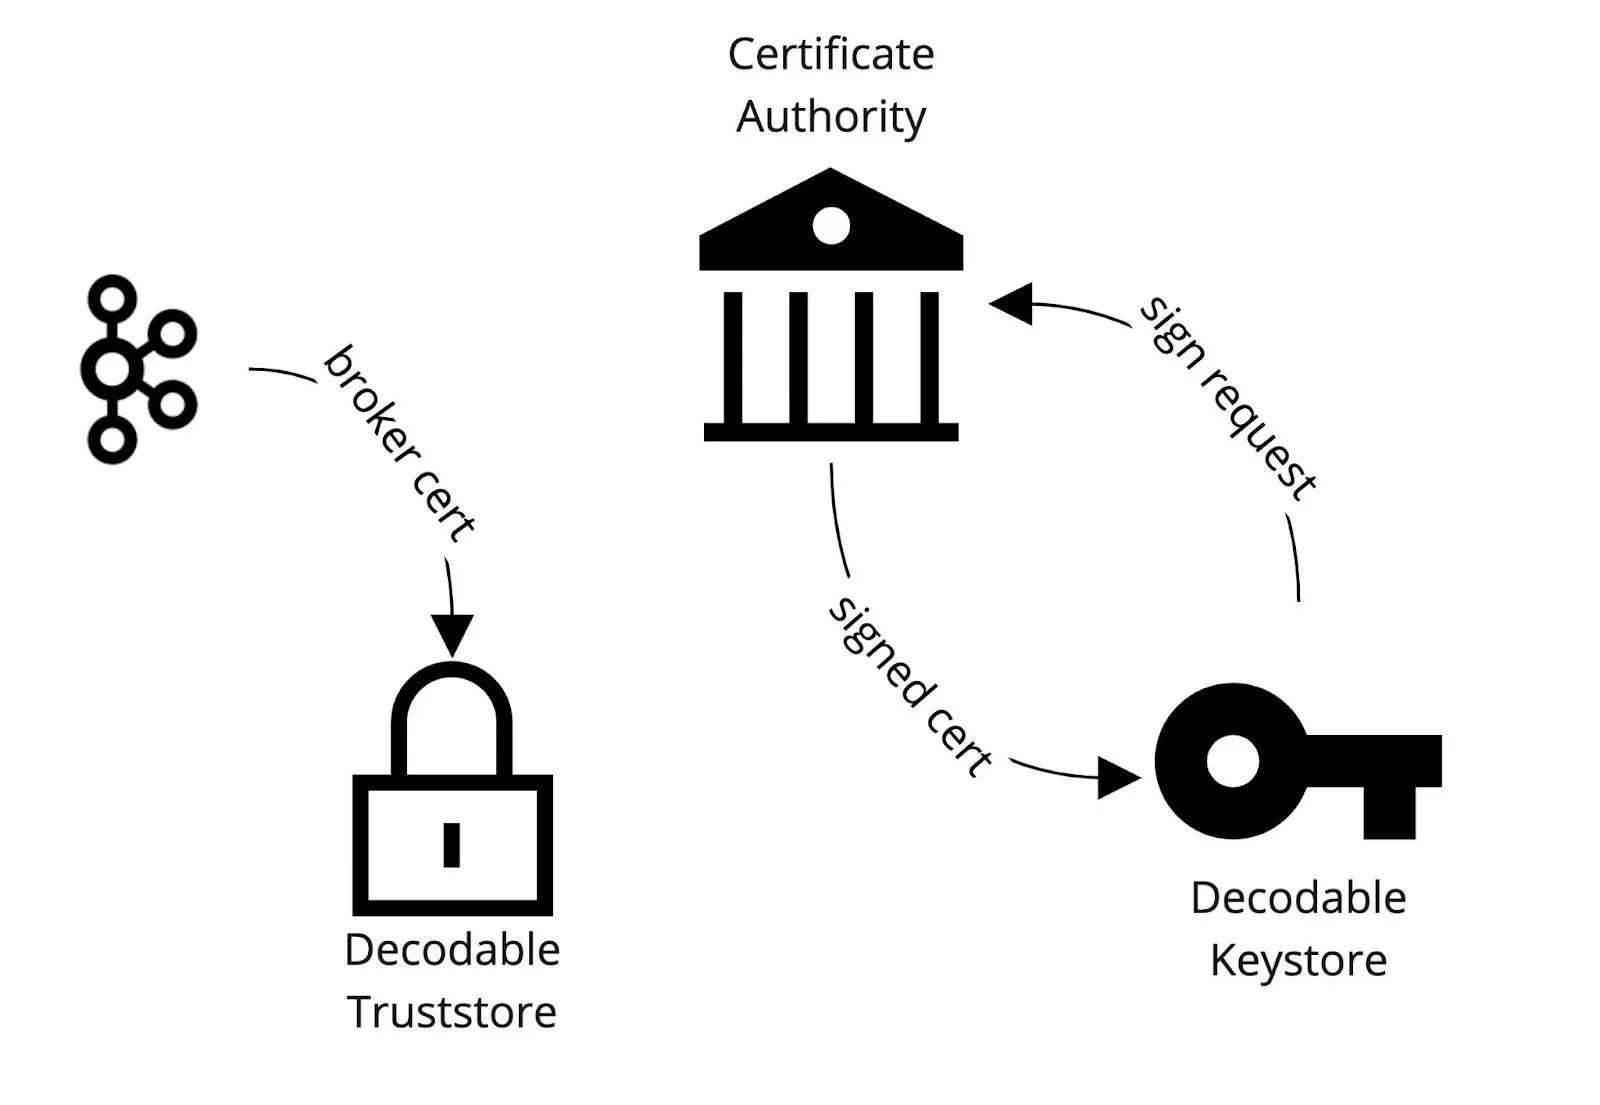
Below is the command to create a Kafka source connection that uses CSR or certificate signed request. You must pass it the server-cert-signed file which is the signed broker certificate.
This command creates the connection but its configuration is incomplete. Decodable uses the broker signed certificate (server-cert-signed) to create a truststore for itself and import the broker's certificate. This establishes that Decodable "trusts" the broker. This is different from what we did for the client in the previous section where we put the ca-cert into the client’s truststore instead of the broker certificate. The latter approach allows clients to “trust” all certificates signed by the CA while the previous approach allows clients to just “trust” the broker.
Then just like what we did for the kafka-console-consumer & producer, we need to create a signed client certificate for Decodable to use to communicate securely.
The command below gets the certificate request that Decodable generated for you to sign with your CA. The certificate request is written to a file decodable_client_cert.pem.
Again we sign the certificate but this time Decodable’s sign request. This outputs a file called decodable_client_cert_signed.
Next we update the Decodable Kafka source connection by passing in the signed certificate so that Decodable can import it into its own keystore.
The diagram below outlines this workflow.
Once this is completed, you can start the Kafka source connection and begin consuming data from a Kafka that was secured with mTLS. The same can be done when creating a Kafka sink connection to write data to a Kafka secured with mTLS. With this in place, you can now apply ACLs that will limit Decodable by granting read only or write only access to certain topics in Kafka. You can find this work in Decodable’s github examples repository. If you want help with this use case, please don’t hesitate to contact us at support@decodable.co.
Watch The Video
Check out the video of me connecting to Kafka via mTLS:
You can get started with Decodable for free - our developer account includes enough for you to build a useful pipeline and - unlike a trial - it never expires.
Learn more:
- Read the docs
- Check out our other blogs
- Subscribe to our YouTube Channel
Join the community Slack


