.svg)


Data movement is the beating heart of modern data infrastructure. It facilitates seamless information flow across systems to power customer interactions, AI, analytics, and so much more. Powered by Flink and Debezium, Decodable handles both ETL and ELT workflows, eliminating the need for teams to compromise between data processing and movement. Beyond providing a core data infrastructure platform, Decodable addresses the challenge of data movement and stream processing pragmatically, reimagining it in a way that is unified, real-time, and cost efficient. By simplifying the most formidable data infrastructure challenge, Decodable enables teams to focus on their core strengths: innovation and delivering value.

One of the most common data movement use cases is replicating a database to a data warehouse for analysis, and in this guide, we’ll look at moving data from MongoDB to Snowflake. MongoDB is one of the most popular non-relational (NoSQL) document database systems. NoSQL systems are optimized for storage and retrieval, offering rapid scalability to manage large and typically unstructured data sets with a wide variety of applications including recommendation systems, IoT and sensor data, and asset management. Similarly, Snowflake is among the most popular online analytical processing (OLAP) systems. OLAP systems are optimized for efficient querying and data analysis workloads, and are typically used as data lakes and data warehouses and drive applications businesses use to enhance their analytical decisions.
MongoDB Overview
MongoDB is a NoSQL document database used for high-volume data storage. As a document store, MongoDB makes use of collections and documents rather than tables and rows. It offers a flexible data model for storing JSON-like data, and provides indexing and replication.
The traditional approach to syncing MongoDB with complementary data stores is batch-based, where pipelines extract data from MongoDB and send it to downstream data stores. Change data capture (CDC) is a modern alternative to inefficient bulk imports. CDC extracts change events (INSERTs, UPDATEs, and DELETEs) in real-time from data stores, such as MongoDB, and provides them to downstream systems which can be applied to a copy of the data.
Snowflake Overview
Snowflake is a fully managed software-as-a-service (SaaS) that provides a single platform for data warehousing, data lakes, data engineering, data science, data application development, and secure sharing and consumption of real-time / shared data. Snowflake features out-of-the-box features like separation of storage and compute, on-the-fly scalable compute, data sharing, data cloning, and third-party tools support in order to handle the demanding needs of growing enterprises.
The Snowflake data platform is not built on any existing database technology or “big data” software platforms such as Hadoop. Instead, Snowflake combines a completely new SQL query engine with an innovative architecture natively designed for the cloud. To the user, Snowflake provides all the functionality of an enterprise analytic database, along with many additional special features and unique capabilities. Snowflake runs completely on cloud infrastructure. All components of Snowflake’s service (other than optional command line clients, drivers, and connectors), run in public cloud infrastructures. Snowflake uses virtual compute instances for its compute needs and a storage service for persistent storage of data. Snowflake cannot be run on private cloud infrastructures (on-premises or hosted) as it is not a packaged software offering that can be installed by a user. Snowflake manages all aspects of software installation and updates.
Prerequisites
Using MongoDB with Decodable
Before you can get data from MongoDB, the following requirements must be met:
- Your MongoDB database must be accessible from the Decodable network. Decodable uses the username and password provided during connection creation to authenticate to the database.
- You must have a MongoDB user with privileges <span class="inline-code">changeStream</span> and <span class="inline-code">read</span>.
- Your MongoDB instance must be configured for change stream replication. See Change Streams in the MongoDB documentation for more information.
Using Snowflake with Decodable
Before you send data from Decodable into Snowflake, do the following in your Snowflake account to make sure that you are able to create a connection to it:
- Generate a private and public key pair for authentication
- Create, configure, and assign a role
If you want to send records from Decodable change streams to Snowflake, then you must also set up a Snowflake warehouse and add some additional privileges in Snowflake.
Create Connectors
Follow the steps in the sections below to get data from MongoDB into Decodable, optionally transform it, and then from Decodable to Snowflake. These steps assume that you are using the Decodable web interface. However, if you want to use the Decodable CLI to create the connection, you can refer to the Decodable documentation for MongoDB and Snowflake for information about what the required property names are.
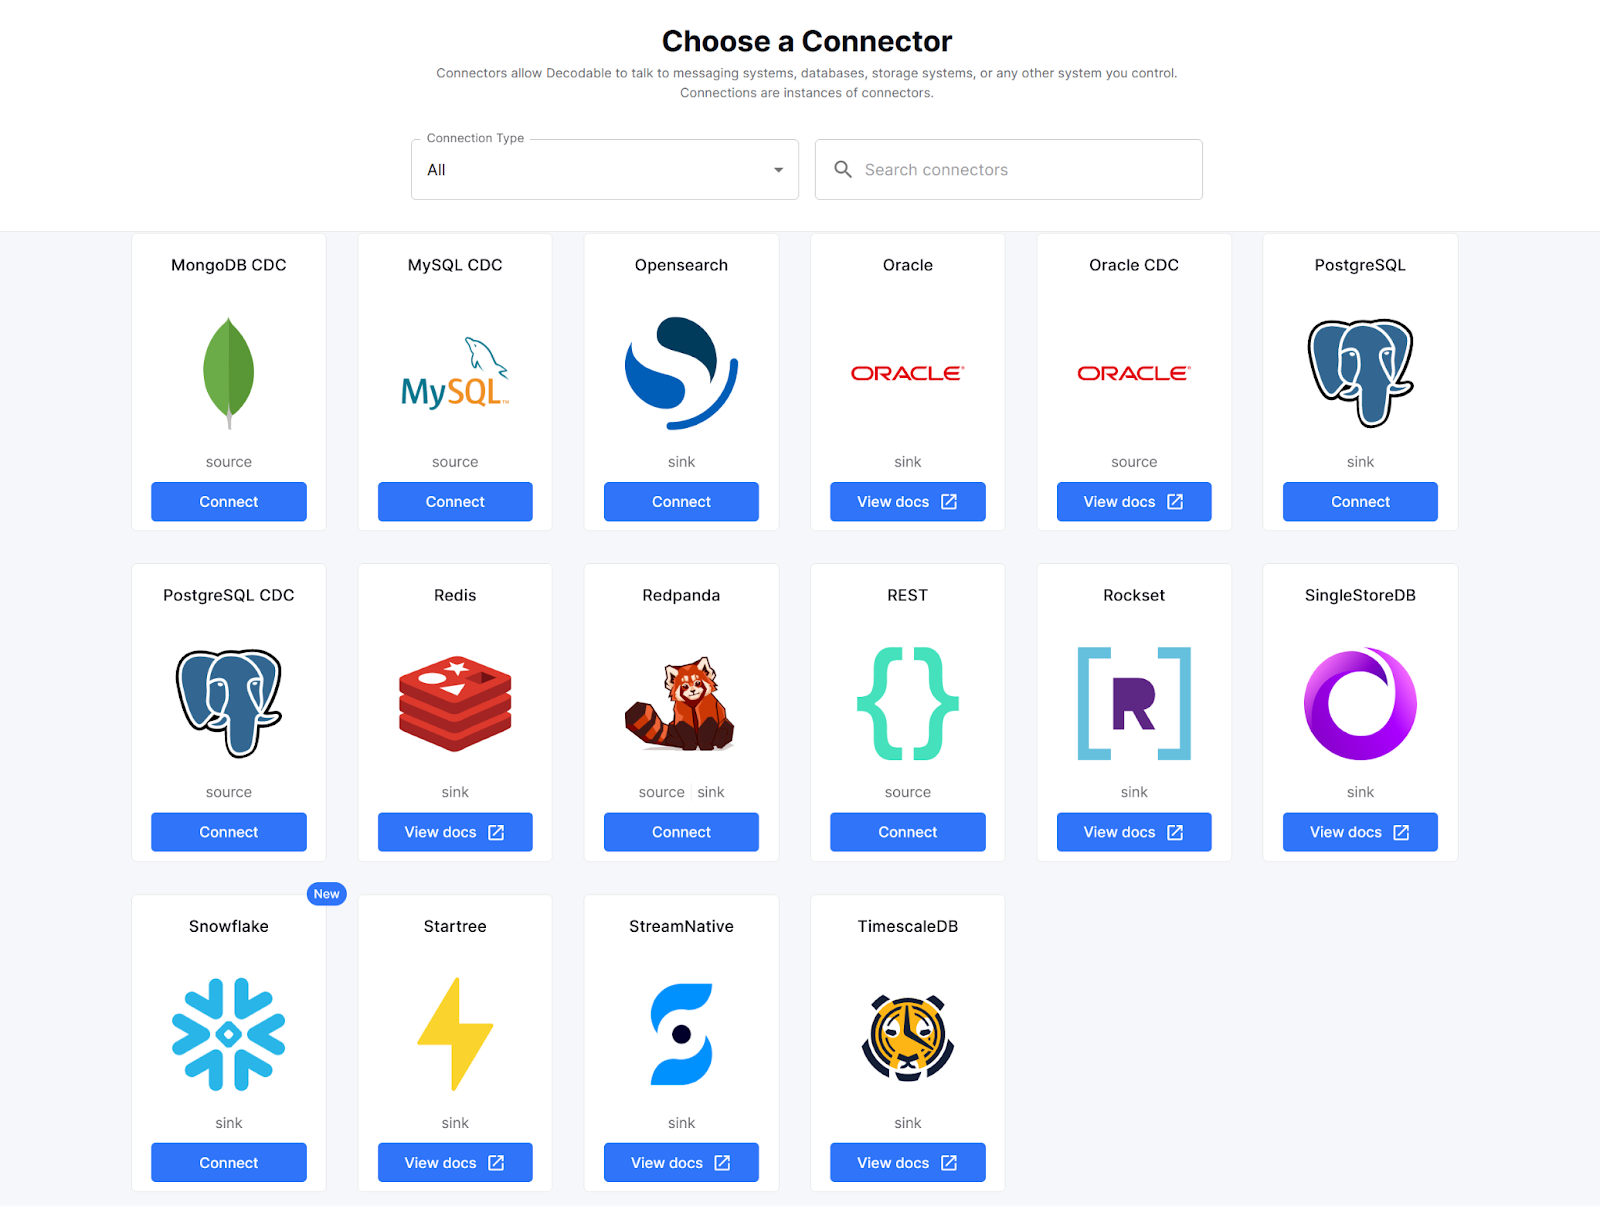
Create a MongoDB Source Connector

- From the Connections page, select MongoDB CDC and complete the required fields.
- Select the stream that you’d like to connect to this connector. Then, select Next.
- Define the connection’s schema. Select New Schema to manually enter the fields and field types present or Import Schema if you want to paste the schema in Avro or JSON format.
<ol type="a"><li>The stream's schema must match the schema of the data that you plan on sending through this connection.</li><li>You must designate one or more fields to use as a primary key. A primary key is a field that contains a value that can be used to uniquely identify each row in a table. To specify a primary key, you must first explicitly tell Decodable that the type is not null.</li></ol> - Select Next when you are finished providing defining the connection’s schema.
- Give the newly created connection a Name and Description and select Save.
- Start your connection to begin processing data from MongoDB.
Create a Snowflake Sink Connector
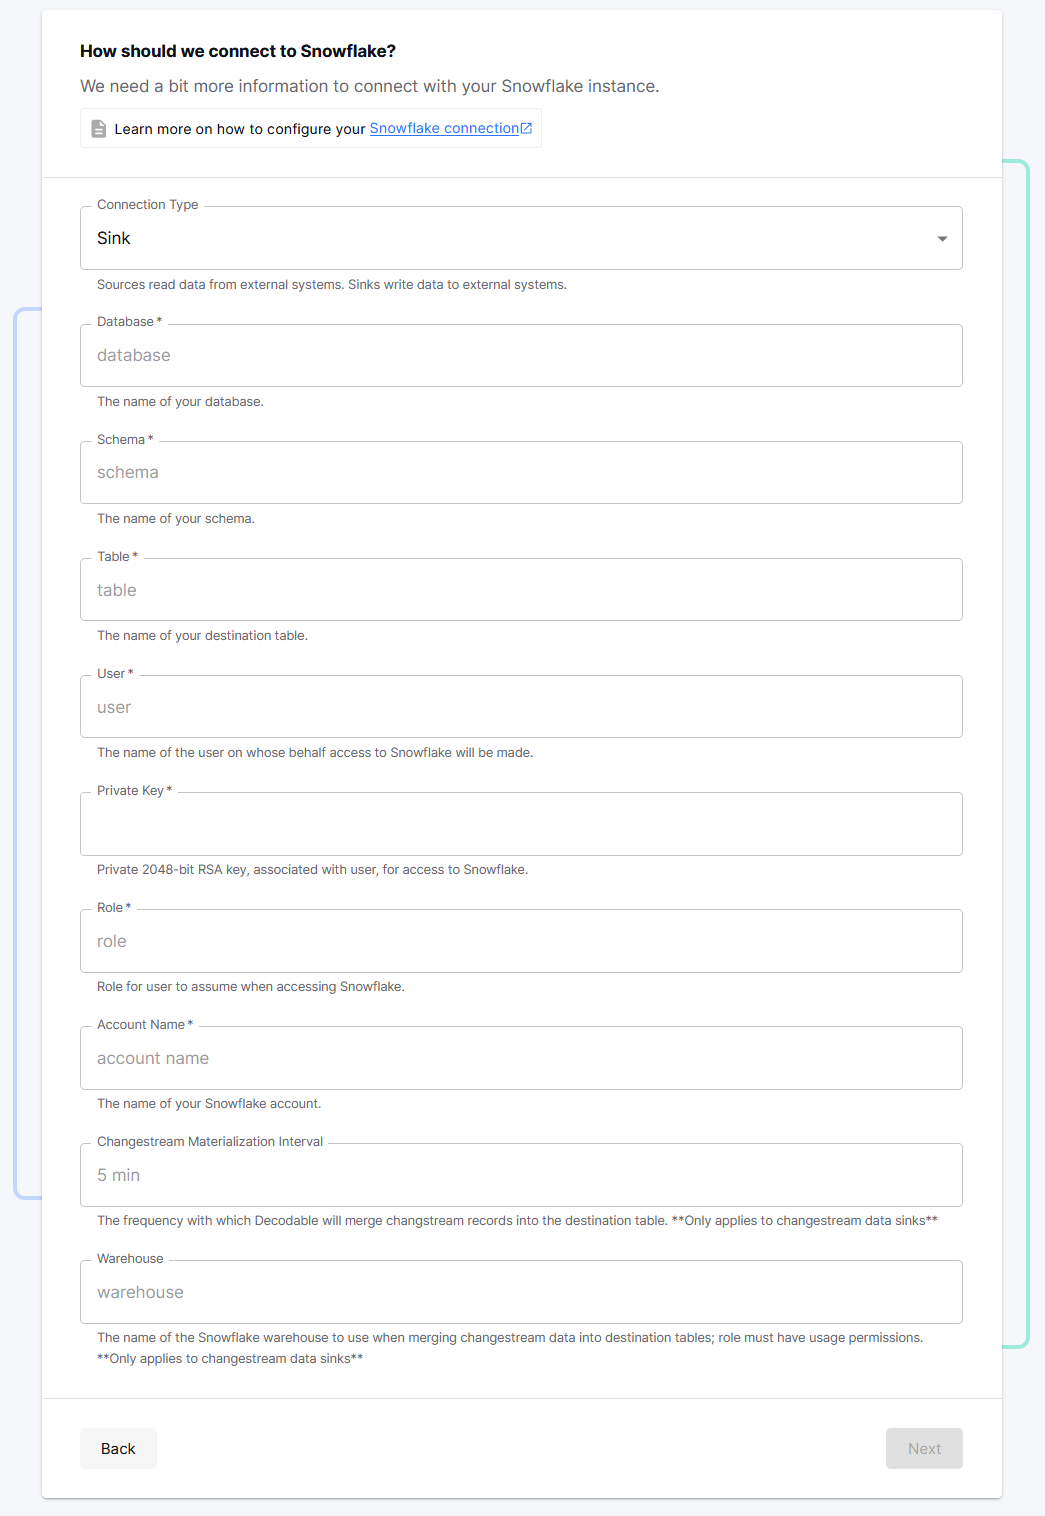
- From the Connections page, select the Snowflake connector and complete the required fields.
- Select the stream created by the MongoDB source connection as the input stream for the Snowflake sink connection. Then, select Next.
- Give the newly created connection a Name and Description and select Save.
- Finally, Start your connection to begin ingesting data.
You can now use this connection to send a stream of records to a given Snowflake table without the need for additional infrastructure such as Snowflake merge tasks or staging data in S3 first. When processing CDC data like this, data is first written to a staging table in Snowflake. The Decodable Snowflake connector will automatically merge these changes into the target table at the merge interval you specify. When ingesting append- or insert-only data, a staging table isn’t needed. Decodable will directly ingest into the target table.
At this point, you have data streaming in real-time from MongoDB to Snowflake!
Processing Data in Real-time with Pipelines
A pipeline is a set of data processing instructions written in SQL or expressed as an Apache Flink job. Pipelines can perform a range of processing including simple filtering and column selection, joins for data enrichment, time-based aggregations, and even pattern detection. When you create a pipeline, you define what data to process, how to process it, and where to send that data to in either a SQL query or a JVM-based programming language of your choosing such as Java or Scala. Any data transformation that the Decodable platform performs happens in a pipeline. To configure Decodable to transform streaming data, you can insert a pipeline between streams. As we saw when creating a Snowflake connector above, pipelines aren’t required simply to move or replicate data in real-time.
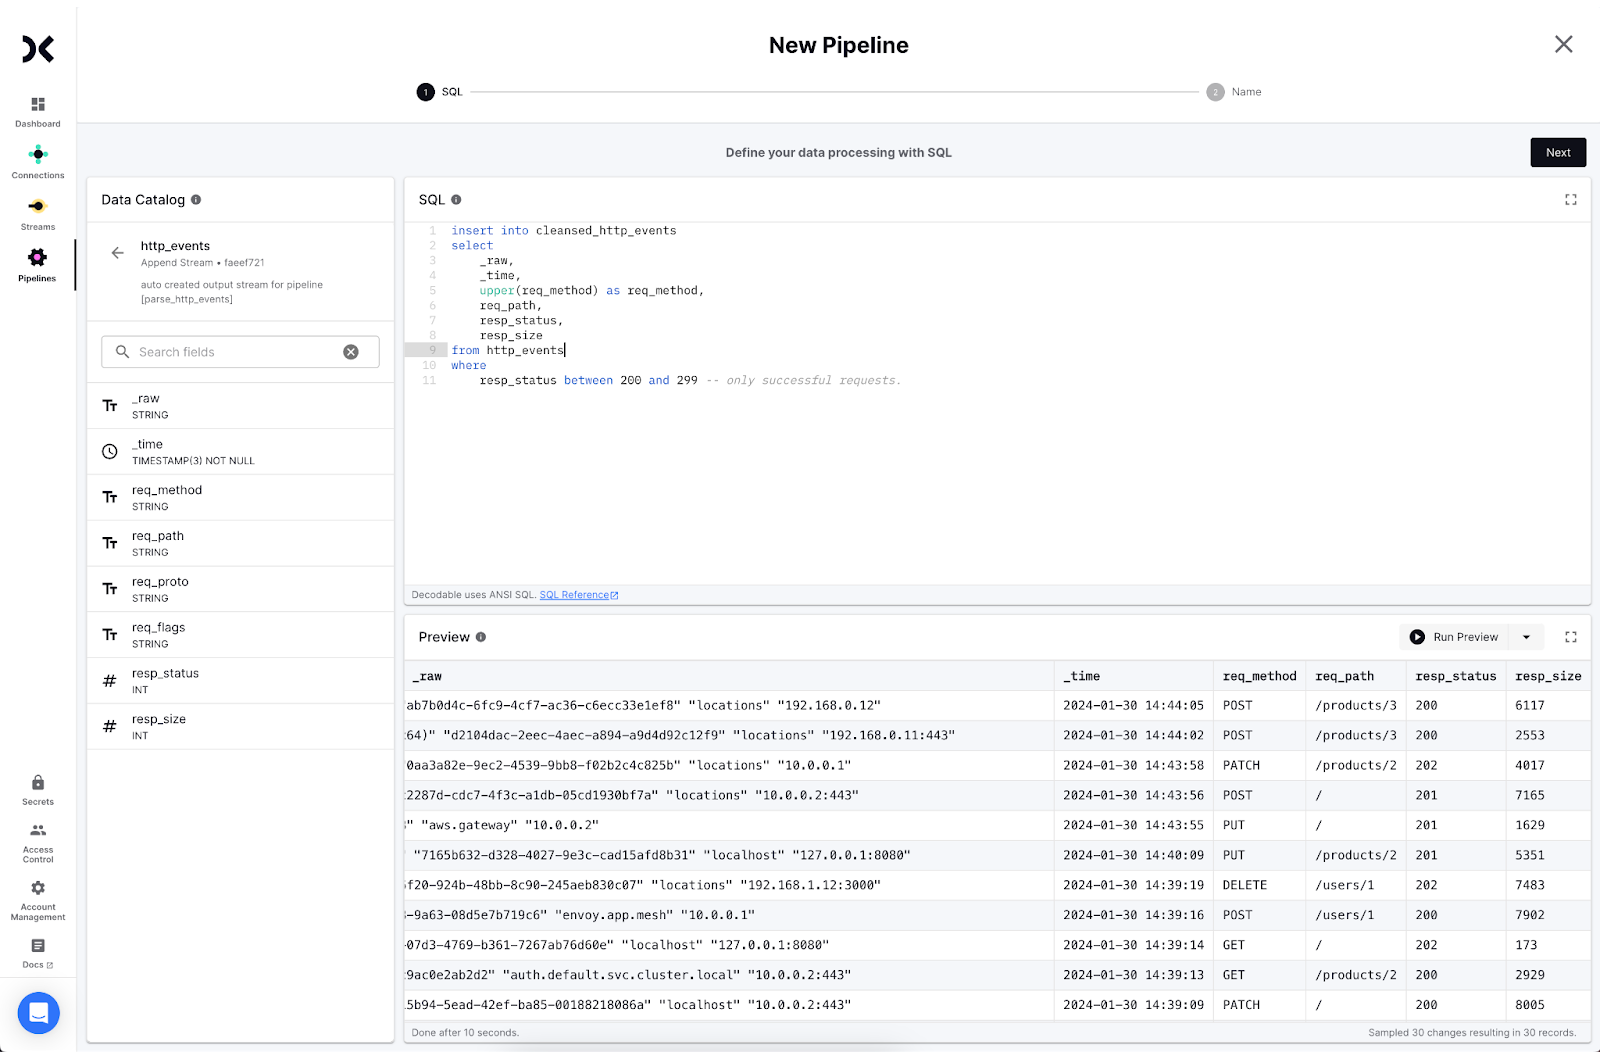
Create a Pipeline Between the MongoDB and Snowflake Streams
As an example, you can use a SQL query to cleanse the MongoDB data so it’s ready for immediate analysis when it lands in Snowflake. Perform the following steps:
- Create a new Pipeline.
- Select the stream from MongoDB as the input stream and click Next.
- Write a SQL statement to transform the data. Use the form: <span class="inline-code">insert into <output> select … from <input></span>. Click Next.
- Decodable will create a new stream for the cleansed data. Click Create and Next to proceed.

- Provide a name and description for your pipeline and click Next.
- Start the pipeline to begin processing data.
The new output stream from the pipeline can be written to Snowflake instead of the original stream from MongoDB. You’re now streaming transformed data into Snowflake from MongoDB in real-time.
Conclusion
Replicating data from NoSQL databases like MongoDB to Snowflake in real-time allows you to make application and service data available for powerful analytics with up-to-date data. It’s equally simple to cleanse data in flight so it’s useful as soon as it lands. In addition to reducing latency to data availability, this frees up data warehouse resources to focus on critical analytics, ML, and AI use cases.


.svg)